100% Newbie WordPress Tutorial


This wordpress tutorial is a complete guide where I am going to teach you from A to Z, how to use WordPress effectively to create a successful business.
If you still do not have a blog, but you are seduced by the idea of starting to develop one, then you should bet on this platform that has all the necessary resources so that your experience as a blogger is pleasant and successful.
What is WordPress and what is it for?
WordPress is a processor and content manager just like Blogger, but still much more powerful, to date it is the number 1 platform and has millions of users who use it to create blogs, websites, online stores, websites. membership, etc.
Its great versatility and ease makes it possible for us to take our websites or blog to higher levels than with other platforms.
In short, if you are going to start a blog online, my recommendation is that you use WordPress.
On the web you will find many guides or wordpress tutorials for beginners, some better than others, but, this one I tried to make it simple and didactic and you just have to follow the guide to be able to familiarize yourself with all its tools.
WordPress in Spanish tutorial explained step by step.
Without further ado, let’s get straight to the point, bluntly.

The image you see represents the page where you will have to log in to enter your WordPress virtual office. For this you have to enter your username and password.
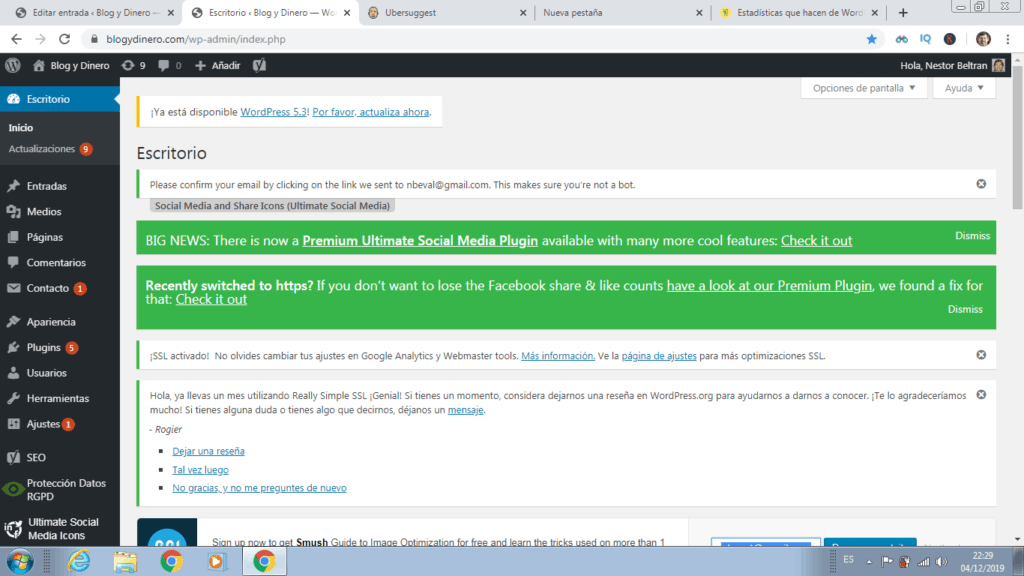
Once you have done this, your desktop will open.

In the upper right corner we have 8 elements and the desktop tab as I show you in the following image.

We have the W logo where if you put the cursor a menu is displayed where you can access the wordpres.org page, documentation, support and suggestions.
The truth is that this menu is not of much importance, unless you want to know more about this fantastic blog platform.
Then we have the Blog and Money tab. When you put the cursor over it, the option to visit the site is displayed.
The next tab where there is a circle with 2 curved arrows, notifies us of the updates of both wordpress, themes and plugins.
Where there is a text icon and a 0, it is to tell us that we have comments to moderate, in this case it is 0, which indicates that there are no comments.
(+ Add), from this tab you can add a new entry, a new page, add images and new users.
See entry. Simply clicking on this tab will take you directly to the entry you are writing.
Then we have a Y and a green dot, this is the Yoast Seo symbol, which is a powerful plugin that allows you to optimize your content to be Google-friendly without losing the goal of writing for your audience.
Surely, once you install WordPres, you will not see it, because, you have to install it. Do not do it until you have read the guide to correctly install and configure the Seo Yoast plugin.
Now we will explain in detail how to use the WordPress tabs found in the left menu of your screen.

Tickets.
If we click on the inputs tab, the page opens and a menu drops down.
All entries.
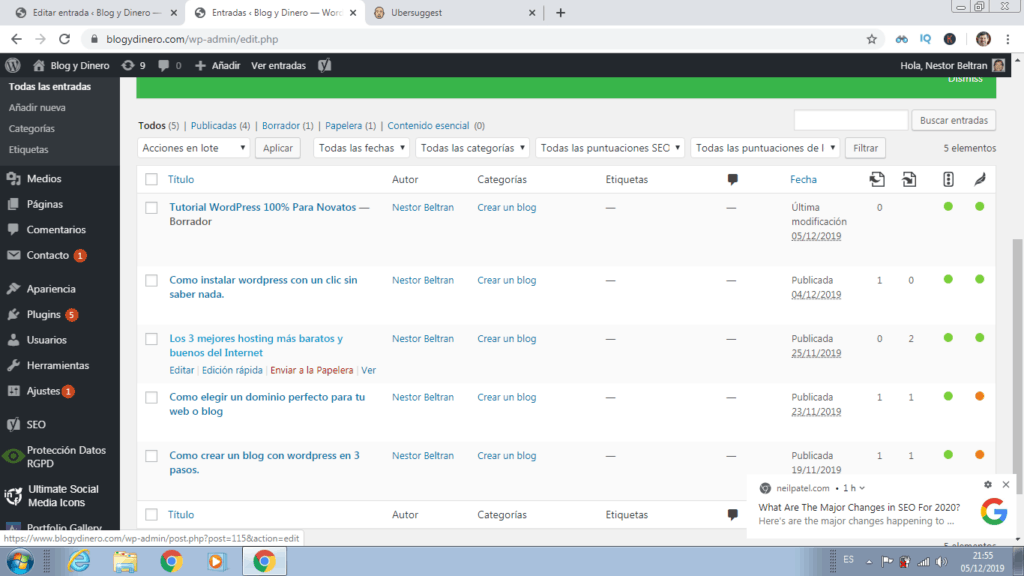
If we click here, it will show us all the entries that we have published and those that are in the draft stage. as I show in the following picture.

If you notice, I have 4 published posts and one in draft which is this one that I am writing now.
ADD NEW.
If we touch add new, it takes us directly to the text editor where your blog entries are written, as I show in the following image.

If you notice, it says add title, that refers to the title of the post or article. In an entry, the title is the most important, because it should attract and provoke curiosity. But we will see this topic later, in a particular post.
Then there is the whole body of the post, in this case, what you are reading after the title, which is the entire development of the post.
CATEGORIES.
Then we have the categories, which are really important, because we will use them to organize our articles or posts.
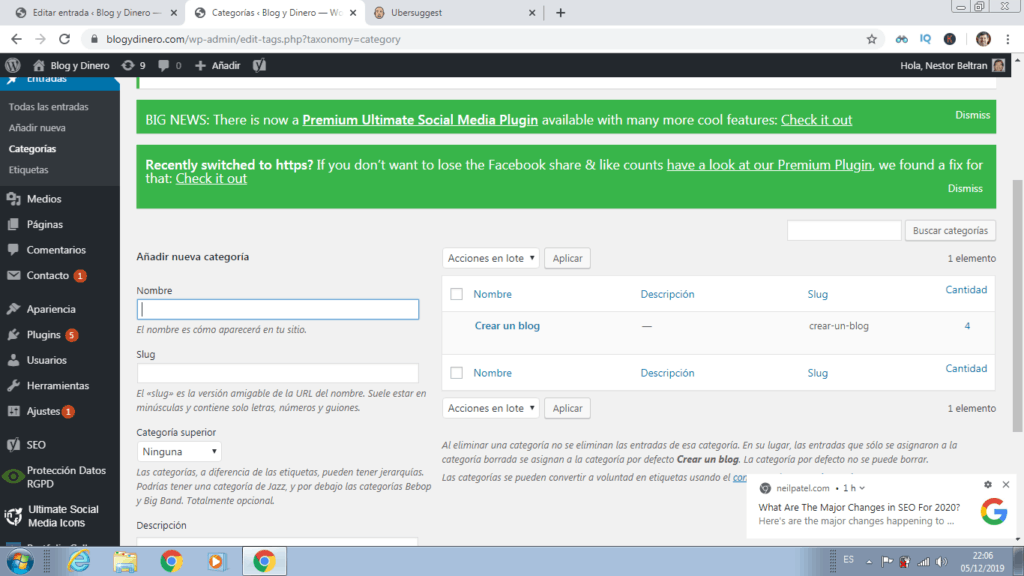
The important thing is that you know that from this page you can add category and remove categories. as shown in the following picture.

For example, where name appears, you put the category and click below on the add new category button.
The use of categories is a very important issue to give a logical structure to the blog. This will be explained in detail in a post.
THE TAGS.
The explanation is very similar to the previous one of the categories, however, the use is not the same and they must be applied with common sense.
For example, if we are writing an entry about Antonio Banderas, the tags could be, actor, artist, celebrity.
The page for adding tags is the same as the page for categories.
Media tab
This functionality allows us to access the image library or directly to add a new one. This means that if you want to use an image that you have saved in the library, all you have to do is find it and embed it in your content.
When you put the cursor on the media tab, it unfolds, library and add new.

Por el contrario, si quieres usar una imagen nueva, solo tienes que subirla en agregar nuevo.


Paginas
Esta pestaña es exactamente igual que la de entradas y opera de la misma manera, tiene un procesador de texto donde tu escribes el contenido y haces todo de la misma manera. Si observas, al hacer clic puedes ir a todas las páginas o bien al botón agregar nueva.
Sin embargo, cabe destacar que el uso y el objetivo de una página es muy diferente a la de una entrada.
Mientras las páginas son utilizadas para incluir información no indexable, como son los políticas, aviso legal, contacto y por supuesto para establecer la home como página principal de tu blog y páginas pilares.
It is likely that all this information makes you dizzy, however in the next posts you will understand all these concepts that are the basis for having a perfectly optimized blog for search engines.
Unfortunately, most people don’t teach you this, and it is for this reason that people often work without seeing tangible results in the short term.
It is for this reason that it is very important that you read and apply the knowledge that I give you in each of these articles.
If you do, you will surely have good results.

Comments
If we click on the comments tab, it takes us to the page where all the comments that our visitors have left us are displayed.

Si te fijas hay un menu donde te indica todos, que significa la cantidad de comentarios que se han publicado, en este caso no hay comentarios,
Después tienes la pestaña mios, pendiente, aprobados, spam y papelera.
Lo que tu haces es moderar, si te parece bien el comentario publicado y la persona se ha esmerado por aportar, entonces tu puedes aprobar el comentario.
Sin embargo aquellos comentarios que son claramente un intento de spam, tu simplemente los mandas a la carpeta de spam y posteriormente lo s envías a la papelera.
Contacto, lo veremos despues, porque no viene incluido en las herramientas de WordPress, porque es necesario instalar un plugin.
Apariencia
Si hacemos clic en la pestaña apariencia nos llevará directo a la página de temas, y podrás ver bajo esta todas las subpestañas que conforman este menú, como se muestra en la imagen siguiente.

The first tab is that of:
TOPICS.
In topics you can choose the one you like the most for your blog.
Usually here people tend to stick looking for the most suitable topic for the blog.
This is a big mistake, I usually use Twenty, and the one in this blog is Twenty Sixteen, I think it’s pretty good and I’m going to confess something that many don’t know.
Twenty are usually themes that are very well optimized, they are friendly in navigation, and this Google likes and you favors you in SEO.
If you notice there is a box that has no theme, but a plus sign. From there you can add a new theme and you just have to click for it to show you what’s in stock.
Then you choose and upload it to your blog.
PERSONALIZE.
If you click on this tab, it will take you to:

In this tab you do exactly what it says, customize the blog. We will explain each option from top to bottom.
Where it says Twenty Sixteen active theme , if you click change, you have the option to change your blog’s theme from there.
In Site Identity , you can choose a logo, modify the title of your blog, add a short description, and choose to show the title and short description or hide it.
In colors, we can change the colors of our entire site.
The following image shows the color changes you can make.
I am not going to delve into it, because it is 100% intuitive.

Widgets.
Widgets are small programs that are included with the theme you have chosen, and they are used to perform some actions automatically, without you having to intervene.
These widgets work in the lower content sidebars.

For example the files widget; allows to display a monthly list of published entries.
The recent comments widget displays the most recent comments for your site.
Custom HTML widget, this one is particularly important, because it allows you to embed banners, registration forms, and so on.
The Menu tab is really important, because it allows us to create a navigation menu for our blog. It is vital if you are following all the steps to create your blog using what I teach you on this site, carefully read all the content, so that you fully optimize your blog and get a lot of organic traffic.
In this section you can add pages, posts or categories.
The important thing is that in this wordpress tutorial I’m going to teach you to use categories as a menu, to classify your posts in a logical way, both so that your visitor and Google like it.

I will quickly explain how to use this page.
Every menu has a structure and the first thing you should do is where it says the name of the menu, you can put menu 1, first menu, and so on.
If you look closely, you have three tabs in the lower left corner: Posts, Custom Links and Categories.
If you click on entries you can choose an entry and place it in the menu, but this does not make sense to do so, because if you had 100 entries you would lack space to put them all.
Preferably the menu is used to put pages that you want the visitor to find quickly, one of those pages is the “contact” page.
In the case of this blog, I have assigned the categories so that they are in the menu, because in this case I am using the categories to organize my blog entries.
Let me explain, in the category “create a blog”, there will be all the entries that are directly related to the topic.
The way to do this, I am going to show you in an article that deals with this topic in a particular way.
The sections header , background and theme editor , it does not make sense to explain to you since it is only to change the appearance of your blog and it is 100% intuitive.
What
Plugins.
This is a very important section, but before going on to explain what you can do from this tab, we are going to define what a plugin is.
Plugins are applications or software that have functions and characteristics that allow you to expand the functionality of your blog in an unlimited way.

As you can see, by clicking on the tab “plugins” we can see 3 sections:
Installed Plugins, when you click, it shows us all the plugins that we have installed on the blog.

In add new, in this tab, when we click, it takes us to the page that allows us to install any plugins, the one we need.

Where it says keyword, you type exactly the name of the plugin you want to install by clicking the install now button and then clicking activate.
Once this is done, the plugin remains operating, however many of these plugins, once installed, must be configured according to the needs you have on your blog.
The editor plugins you should not touch it , this is a section for those people who know advanced programming codes.
If you liked this WordPress tutorial, share it with your acquaintances and friends.
Users.
From this section you can add users.
This is useful when we have other bloggers contributing content. At the moment it is not important and surely you will not use it.

In your profile , you can update your data, change passwords, add the profiles of social networks, but it is not necessary since for social networks we will use a plugin.
Tools.
We will not see this section for the moment, since it has no immediate use.
Settings.
In this section we can make changes and configure writing, reading, comments, etc.

In general settings , we can change the title of our blog, write a short description, adjust our time zone and we leave the rest the same.
In writing , you should practically not touch anything.
Reading is important since in this section we can choose the page that we want to show when a person searches for us by domain, in my case it is “Blog and Money”.

But you can also display a page with the latest posts. All you have to do is mark Your last entries.
As I explained before, I use my Home as a cover, you do this in the cover section.
The reason why I have my home page as the cover is that it is the main page of my blog and it is the one with the most keywords. It is a semantically speaking page rich in search terms, and it is the tip of my pyramidal structure, where all the pillar pages with which I will link the blog entries in an organized way will be linked.
We will see all this later, so that you can put together a very well optimized SEO blog.
Comments , do not touch anything, leave it as is.
Means . Refers to images and videos. In this section you do not need to touch anything, leave it as it is.
Permanent links , here we are going to do something important

We are going to customize the structure of our links to be able to work with a pyramid architecture.
Where it says custom structure, we are going to add this code. /% category% /% postname% /.
This allows us to use categories to classify our content and give it a vertical sense, although our blog talks about many topics related to the developed niche.
We have already reached the end of this WordPress tutorial.
If it was useful to you and you appreciate my effort to deliver quality content, share it with your social networks and don’t forget to leave me a comment.
From already thank you very much.


